Contact Us
Blog Short Form
"*" indicates required fields

Installing a Glove in a Containment Unit
The installation of a glove in a containment unit is crucial for maintaining the integrity and safety of the containment system, especially when dealing with hazardous materials or environments. This process involves careful attention to detail to ensure the glove provides a secure, leak-proof barrier. Following these steps carefully to install a glovebag containment system, can prevent contamination and ensure safe operation.
Step 1: Selecting and Preparing the Glove
Choose a rubber glove, preferably size 10 or 11, as these sizes offer a good fit for most operators and provide enough material to achieve a secure seal. The gloves must be installed at specific locations indicated on the installation sheet, which is often included with the containment unit. Positioning the gloves accurately will help ensure they are accessible and properly oriented for the intended tasks within the containment.
Step 2: Orienting the Glove for the Working Position
Proper orientation is critical, as it allows for ease of movement and access to the contents within the containment. Ensure the glove is aligned in a way that matches the natural working position for the operator. This will help prevent fatigue or awkward postures when using the glove for extended periods.
Step 3: Inspecting the Glove for Pinholes
Before proceeding with installation, inspect the glove thoroughly for any pinholes or small punctures. A quick method for this is to trap a small amount of air inside the glove and then gently squeeze it. Watch for any air leaks, as these can indicate a pinhole. Pinholes compromise the glove’s integrity and should be addressed before installation to avoid any breaches in containment.
Step 4: Attaching the Sleeve to the Glove Ring
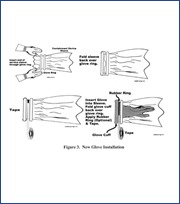
Insert the end of the sleeve through the ring of the glove. Fold the sleeve’s end back over the glove ring, ensuring it covers the entire glove ring. This fold creates a secure barrier and helps maintain the structural integrity of the containment.
Step 5: Securing the Sleeve
Tape the sleeve firmly into the groove of the glove ring. It’s important to apply enough tape to create a secure, airtight seal that won’t shift or come loose during use. A solid seal here helps keep any contaminants or hazardous substances safely contained.
Step 6: Positioning the Glove within the Sleeve
With the glove ring and sleeve in place, insert the glove into the sleeve. Ensure the glove is oriented correctly within the containment for optimal working conditions. Fold the glove’s cuff back over the glove ring, pressing it into the groove at the center of the ring. This fold provides additional sealing and helps lock the glove in place.
Step 7: Optional Rubber Ring for Additional Security
For additional reinforcement, consider placing a rubber ring over the glove and sleeve, pressing it into the groove of the glove ring. This step provides extra stability to the connection between the glove and sleeve.
Step 8: Applying Tape or Alternative Fasteners
Secure the rubber ring with tape, if used, to prevent it from slipping. In cases where a rubber ring isn’t available, other items like hose clamps, bungee cords, cable ties, or Tygon tubing can be used as alternative fasteners to secure the glove-sleeve interface.
Step 9: Final Seal Check
Once everything is secured, perform a final seal check. Trap a small amount of air in the sleeve and glove, and gently squeeze to check for any leaks. If no air escapes, the glove is sealed and ready for use within the containment.
In following these steps, the glove should now be installed in a secure and airtight manner, ready for safe use in hazardous containment tasks. Next week, we’ll cover how to safely change out a glove with a hole once the glove bag is contaminated.
Quick Step-by-Step Instructions – Installing a Glove in a Containment
1. Install rubber gloves (size 10 or 11 gloves are suggested) at locations indicated on the installation sheet.
2. Ensure proper orientation for working position.
3. Check the glove for pinholes by trapping air in the glove and squeezing.
4. Insert the end of the sleeve through the ring glove and fold the end of the sleeve over to cover the glove ring.
5. Tape the sleeve into the groove of the glove ring securely.
6. Insert the glove into the sleeve in the appropriate working position and fold the cuff of the glove over into the center groove of the glove ring.
7. Place the rubber ring (optional) over glove and sleeve and into the groove in the glove ring.
8. Apply tape over rubber ring. In place of a rubber ring, you can use a hose clamp, bungee cord, cable tie or Tygon tubing.
9. Check that glove is sealed by trapping air in sleeve and glove and squeezing.
Next week: How to change out a glove that has a hole in it after the glove bag is contaminated

About the Author:
Learn more about Lancs Industries and how they have been the leaders in radiation shielding for over 50 years. Find out more about their founder, where they've been and where they're going.
Contact Us
Blog Short Form
"*" indicates required fields
Subscribe to our Newsletter
Get industry updates and new blogs straight to your inbox.
"*" indicates required fields

